In addition to Enlightenment Framework’s powerful features, the Enlightenment Theme offers some basic visual customization options that you can apply to your website. Read further to find out how you can master the visual appearance of your website using some simple and intuitive options:
This tutorial is part of the series “Enlightenment Theme Documentation“. Enlightenment is a powerful theme that can help you create advanced page layouts for your website, but may require a bit of mastering for beginners. Make sure to read all of the theme’s documentation tutorials to get the most out of this theme.
Unless otherwise specified, the options covered in this tutorial can be found in the WordPress admin under “Appearance > Theme Options > General”.
Personalize the Blog Tagline
Every blog archive displays a corresponding title and supported archives (like categories and tags) also display a description if specified. For the blog’s home page the title tagline can be personalized using the option “Blog Pages Header Text”:

The tagline is displayed on the blog’s front page before the list of posts:

Display Featured Images as Header Images
Featured images are not displayed by default in single posts, unless they are manually inserted in the post content. Instead, you can opt to replace the custom header image with the post’s featured images by checking the “Display post thumbnail as header image on single posts” option:

The page’s title will display over a darkened version of the post’s featured image:

Featured Images Crop Flag
By default featured images are resized maintaining scaled proportions. This results in an uneven grid where both landscape and portrait images can be displayed:

Checking the option “Hard crop post thumbnails” will crop post thumbnails to 4:3 dimensions, regardless of initial proportions:

Afterwards featured images will be displayed with fixed proportions resulting in a more even grid:

The option alone will not affect featured images uploaded before it was activated. To make earlier images comply to the new setting you need to regenerate their thumbnails using the AJAX Thumbnail Rebuild plugin:

You only need to regenerate featured images with the handle “enlightenment-blog-thumb” and “enlightenment-teaser-thumb” as shown in the screenshot above.
Blog Featured Images Size
Featured images can be displayed as either a large, full width image or a small, floated to the left thumbnail that can be changed using the “Thumbnails Size” option:

The “Small” option displays featured images as smaller thumbnails floated to the left:

Customizing Post Byline
By default the post byline displays the post author, publish date, category, number of comments and an edit link for authors. You can remove any of these items from the “Entry Meta” checkboxes:

If you are using Jetpack’s Portfolio custom post type, an additional option for “Project Type” will appear for this post type.
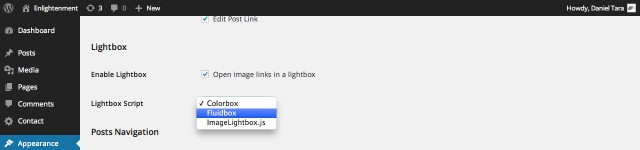
Customizing the Lightbox Script
The theme offers the option to display image links in a lightbox. This option is enabled by default and can be disabled by unchecking the “Open image links in a lightbox” checkbox and the option “Lightbox Script” allows you to choose between Colorbox, Fluidbox and ImageLightbox.js:
Here’s an example of an image displayed in a lightbox using the Colorbox script:

Customizing the Posts Navigation
The theme offers several options to navigate through archive pages. From the option “Posts Navigation Style” you can select to display the posts navigation with either Infinite Scroll, AJAX Links or the traditional static links:

Infinite scroll is the default option and automatically loads the next set of posts when the bottom of the page has been reached. The “AJAX Links” option displays a link at the end of the posts that when clicked loads the next set of posts without leaving the page:

Static links can be configured to display as “Next/Previous” links or as numbered pagination. The labels of “Next/Previous” links can also be configured from the “Static Links Labels” option:

Here’s an example of static links navigation with numbered pagination:

Customizing the Footer Text
By default the footer displays the copyright information with current year and website title. This text can be customized from the “Copyright Notice” option:

One the front-end the text %year% will be replaced with the current year and %sitename% with the website name specified under Settings > General:
Credit links for theme, author and WordPress can also be enabled or disabled individually.
Customizing the Page Design
The theme has 2 page designs that can be used to display content: A “Boxed Design” that displays borders around the page’s content and a “Full Screen Design” that overlays the content on a white background. The global option for the page design can be changed from “Appearance > Theme Options > Design” under the “Page Design” section:

The Page Design can be changed individually for each post or page from the post editor, from the “Page Design” meta box in the right column:

Adding custom CSS Rules
Some visual customizations that are not covered by the built-in options may still be simple enough that they only require just a few lines of CSS. In this case it’s more convenient to add these rules to the “Custom CSS” option rather than creating a child theme.
The CSS Editor can be found in “Appearance > Theme Options > Design” under the “Custom CSS” section:

Conclusion
While we have given extra care to cover what we considered to be the most useful visual customization options, we’ve surely missed on some great ones. Please let us know in the comments section what other customization features you would like to see included in this theme.
Remember to read our other tutorials that cover the documentation for Enlightenment Theme.